Installing boot9strap (Soundhax)
קריאה דרושה
Soundhax (when combined with pre9otherapp) is compatible with versions 4.0.0 through 8.1.0 in the EUR, JPN, KOR, and USA regions.
To extract the .7z files linked on this page, you will need a file archiver like 7-Zip or The Unarchiver.
Note that cartridge updates will only deliver updates to core features, such as the System Settings, Home Menu, etc. cartridge updates will not deliver updates to Nintendo 3DS Sound and Network features, such as System Transfer, Internet Browser, StreetPass Mii Plaza, or eShop.
This means that using a cartridge update from a version containing an older Nintendo 3DS Sound version (<3.0.0) to one that introduced a newer Nintendo 3DS Sound version will break Soundhax! You will need an alternate method of entering the Homebrew Launcher such as Installing boot9strap (Browser) or Installing boot9strap (MSET)!
What You Need
- The latest release of Soundhax (for your region, device, and version)
- The latest release of SafeB9SInstaller
- The latest release of boot9strap (standard boot9strap; not the
devkitfile, not thentrfile) - The latest release of Luma3DS (the
.7zfile) - The latest release of the Homebrew Launcher
- The latest release of pre9otherapp (the
.binfile corresponding to your firmware version)
הנחיות
חלק I - הכנות
- תכבו את המכשיר
- תכניסו את ה-SD שלכם למחשב
- תעתיקו את קובץ האודיו עם סיומת “M4A” שמתאים לקונסולה שלכם ל-SD
- Copy the pre9otherapp payload to the root of your SD card and rename it to
otherapp.bin - תעתיקו את הקובץ
boot.firmמתוך ה.7zשל Luma3DS לתוך ה-SD שלכם - תעתיקו את
boot.3dsxאל שורש כרטיס ה SD - תצרו ב-SD שלכם תיקייה חדשה בשם
boot9strap - תעתיקו את
boot9strap.firmואתboot9strap.firm.shaמה.zipשל boot9strap אל תיקיית/boot9strap/על כרטיס הSD שלכם - Copy
arm9.binfrom the SafeB9SInstaller.zipto the root of your SD card - תכניסו מחדש את כרטיס הSD שלכם לתוך המכשיר שלכם
- תפעילו את המכשיר
חלק II - הפעלת SafeB9SInstaller
- תכניסו מחדש את כרטיס הSD שלכם לתוך המכשיר שלכם
- תפעילו את המכשיר
-
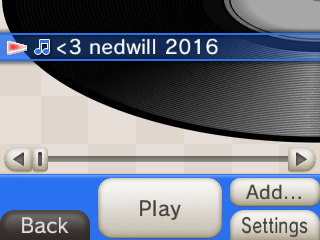
כנסו לנגן המוזיקה
- אם אף פעם לא פתחתם את נגן המוזיקה מקודם ואתם מקבלים טיפים על איך להשתמש בו, אז תעברו את כל הטיפים של הציפור, ואז תסגרו את הנגן ותפתחו אותו מחדש
- בסיטואציה הזאת, הפעלת SoundHax מיד תגרום לעצות אלה להופיע כל פעם שמפעילים את Nintendo 3DS Sound עד שעושים את זה
- תעברו אל ‘ / SDCARD “, ואז תפעילו את” < 3 nedwill 2016 “
- זה עלול לקחת הרבה נסיונות
- אם זה נקפא, כבו בכוח את המכשיר על-ידי החזקת כפתור ההדלקה ולאחר מכן נסו שוב
- כעת אתם אמורים להיכנס לתוך SafeB9SInstaller
חלק III - התקנת boot9strap
- תחכו שכל בדיקות הבטיחות יסתיימו
- כאשר תתבקשו, תלחצו על הכפתורים שנתונים לכם כדי להתקין את boot9strap
- כשזה סיים, לחצו על (A) כדי לאתחל את הקונסולה
חלק IV - הגדרת Luma3DS
- הקןנסולה שלכם צריכה לאתחל לתפריט ההגדרות של Luma3DS
- אם אתם מקבלים מסך שחור, תעקבו אחרי המדריך הזה
- השתמשו במקש (A) ובמקשי החיצים על מנת להפעיל את ההגדרות הבאות:
- “Show NAND or user string in System Settings”
- לחצו על (Start) על מנת לשמור ולהפעיל מחדש
- אם אתם מקבלים שגיאה, פשוט תמשיכו בעמוד הבא