Homebrew Launcher (Soundhax)
Leitura Obrigatória
O Homebrew Launcher possui vários pontos de entrada diferentes, ou métodos de execução.
Soundhax (when combined with the Homebrew Launcher) is compatible with versions 9.0.0 through 11.3.0 in the EUR, JPN, KOR, and USA regions.
Ensure your device’s Wireless Communication is turned on as udsploit (used in the next page) will need the wireless module to be active to function, and some devices (New 3DS, New 2DS, and Old 2DS) cannot adjust the Wireless Communication setting from the Homebrew Launcher. Wireless Communication only has to be on; connecting it to an access point is not required.
To extract the .7z files linked on this page, you will need a file archiver like 7-Zip or The Unarchiver.
Note that cartridge updates will only deliver updates to core features, such as the System Settings, Home Menu, etc. cartridge updates will not deliver updates to Nintendo 3DS Sound and Network features, such as System Transfer, Internet Browser, StreetPass Mii Plaza, or eShop.
This means that using a cartridge update from a version containing an older Nintendo 3DS Sound version (<3.0.0) to one that introduced a newer Nintendo 3DS Sound version will break Soundhax! Você vai precisar de um método alternativo para iniciar o Homebrew Launcher!
What You Need
- The latest release of the Homebrew Launcher
- The latest release of Soundhax (for your region, device, and version)
- The latest release of SafeB9SInstaller
- The latest release of boot9strap (standard boot9strap; not the
devkitfile, not thentrfile) - The latest release of safehax (the
.3dsxfile) - The latest release of udsploit
- The latest release of Luma3DS (the
.7zfile) - The otherapp payload (for your region and version)
Instructions
- Desligue seu dispositivo
- Insira o cartão SD no seu computador
- Create a folder named
3dson the root of your SD card if it does not already exist - Copy
boot.3dsxto the root of your SD card - Copy the Soundhax
.m4ato the root of your SD card - Copy the otherapp payload to the root of your SD card and rename it to
otherapp.bin - Copie o
boot.firmdo.7zdo Luma3DS para a raíz do seu cartão SD - Crie uma pasta chamada
boot9strapna raiz do seu cartão SD - Copie os arquivos
boot9strap.firmeboot9strap.firm.shado.zipdo boot9strap para a pasta/boot9strap/no seu cartão SD - Copy
safehax.3dsxto the/3ds/folder on your SD card - Copy
udsploit.3dsxto the/3ds/folder on your SD card -
Copy
SafeB9SInstaller.binfrom the SafeB9SInstaller.zipto the root of your SD card and renameSafeB9SInstaller.bintosafehaxpayload.bin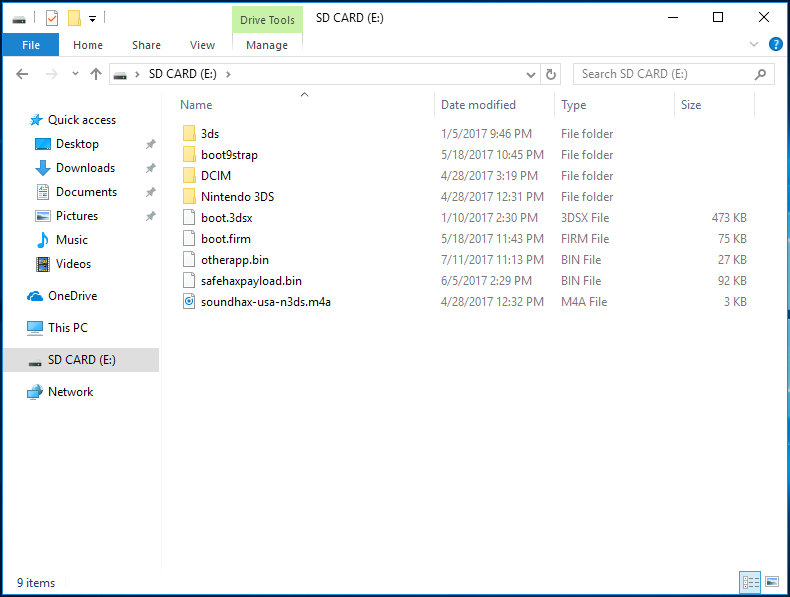
- Reinsira seu cartão SD no seu dispositivo
- Ligue o seu dispositivo
-
Abra o Som Nintendo 3DS
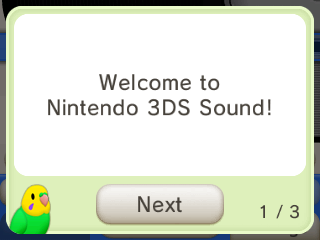
- Se você nunca abriu o Som Nintendo 3DS antes e receber as dicas de como utilizá-lo de um ícone de pássaro, passe por todos os palpites dos papagaios, depois feche o aplicativo normalmente e abra-o novamente
- Nesta situação, abrir o Soundhax imediatamente faria com que estes palpites aparecessem toda vez que o Som Nintendo 3DS fosse aberto até que isto fosse feito
- Vá até
/SDCARD, depois toque “<3 nedwill 2016”- Isso pode levar várias tentativas
- Se o console congelar, force-o a desligar segurando o botão Power, e então tente novamente
- If you get a red screen, ensure you copied
boot.3dsx(the Homebrew Launcher) to the root of your SD card
-
If the exploit was successful, your device will have loaded the Homebrew Launcher